Connecting an MCP Client
wpmcp exposes its tools over the Model Context Protocol via the official WordPress Abilities API. Every ability wpmcp registers requires a caller to be authenticated as a WordPress user who can edit_posts, so the first step is deciding how the client signs in. There are two ways, and the WP MCP > Connection screen in wp-admin shows a ready-made config block for each client either way.
Which client works best today
The Claude clients are the most tested path and work on a default install with an Application Password. Clients that can only sign in with OAuth, ChatGPT among them, need OAuth switched on first: it ships off.
| Client | How it signs in | Setup it needs | How well tested |
|---|---|---|---|
| Claude Code | Application Password | One command, or one .mcp.json entry. Works on a default install. |
Most tested, alongside Claude Desktop. |
| Claude Desktop | Application Password (desktop bundle or config file). OAuth for the custom connector. | Download the bundle from the Connection screen and enter the password. The custom connector needs OAuth switched on first. | Most tested, alongside Claude Code. |
| Cursor | Application Password | One entry in .cursor/mcp.json. Works on a default install. |
Supported through the standard MCP config. Our own testing is done mostly with Claude clients. |
| ChatGPT | OAuth only. It cannot send an Application Password. | A site administrator switches OAuth on in wp-config.php (it ships off), then adds the site in ChatGPT as a custom MCP server. |
Works through OAuth once it is enabled. Not fully tested yet. A one-click switch is planned. |
Option A: OAuth 2.1 (for clients that sign in with OAuth)
wpmcp ships a full OAuth 2.1 authorization server with PKCE (S256 is mandatory), so an MCP client that supports OAuth signs in the way it signs in anywhere else: it opens your site, you log in as a WordPress user, approve the client, and the client receives a token. No password is ever pasted into a config file, and a connection can be lowered or revoked later without touching the client.
OAuth is off by default. Switch it on by defining WPMCP_OAUTH_ENABLED in wp-config.php (or returning true from the wpmcp_oauth_enabled filter):
define( 'WPMCP_OAUTH_ENABLED', true );Then, in your client, add the MCP endpoint and let it discover the authorization server. The Connection screen lists the discovery addresses clients use for this site, including sites installed in a subdirectory.
When you approve a client you choose what it may do:
- Full access: the token can do what your user can do (the
mcpscope). - Read-only: the token may list and read, and is refused anything that changes the site (the
mcp:readscope). A client that asks only formcp:readis narrowed to it automatically. - A scoped identity (site owners): the connection is bound to one of your scoped identities, so governance decides what it may do.
A token never gains scope when it is refreshed, and lowering a connection’s access on the Connection screen takes effect on its next request without reconnecting. Clients can register dynamically or sign in with a client metadata document (an https URL as their client ID); site owners can require approval of new clients, and approve or block them, on the same screen. Blocking a client revokes its tokens.
Option B: an Application Password
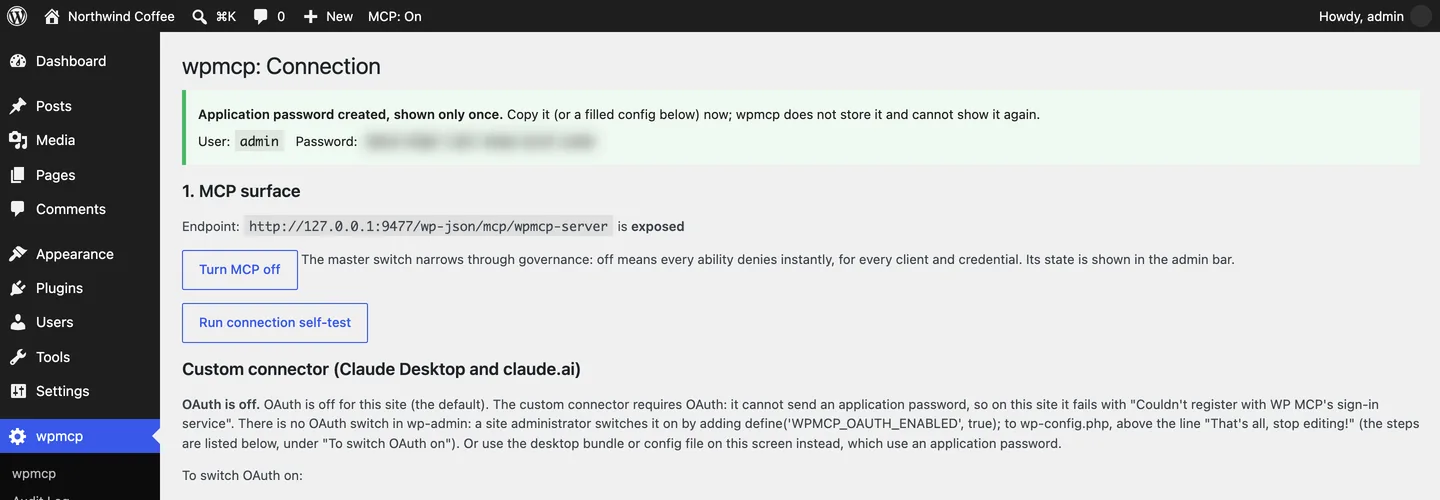
For clients or scripts without OAuth support, wpmcp also accepts WordPress’s built-in Application Passwords. No separate API key system, no additional plugin.
Step 1: create an Application Password
- In wp-admin, go to Users -> Profile (or edit the specific user the agent should act as).
- Scroll to Application Passwords.
- Give it a name (e.g.
claude-code) and click Add New Application Password. - Copy the generated password immediately. It is shown once.
Use a dedicated user for agent access rather than your own admin account, so you can revoke it independently and see its actions clearly in the operations list.
Step 2: encode the credential
MCP clients that speak HTTP typically expect a Basic auth header, which is the base64 encoding of username:application-password:
echo -n "your-username:xxxx xxxx xxxx xxxx xxxx xxxx" | base64Keep the spaces in the application password exactly as WordPress generated them before encoding.
Step 3: point your client at the MCP endpoint
Claude Code
Add an entry to your project’s .mcp.json:
{
  "mcpServers": {
    "wpmcp": {
      "type": "http",
      "url": "https://your-site.com/wp-json/mcp/wpmcp-server",
      "headers": {
        "Authorization": "Basic BASE64_OF_username:application-password"
      }
    }
  }
}
Replace your-site.com with your actual domain and the Authorization value with the base64 string from step 2.
Cursor and Claude Desktop
Both are MCP-compatible clients, and the same endpoint and Basic-auth header work in their respective MCP server configuration. The .mcp.json example above will need to be adapted to whatever configuration format the client expects, but the URL and header are identical: no wpmcp-specific setup beyond the Application Password.
Local development: the WP-CLI stdio bridge
On a machine that has WP-CLI and the site’s files, a client can also run wpmcp over stdio through the bundled WP-CLI command, wp mcp-stdio serve --user=<login>, with no HTTP credentials at all; the client runs it as a local process and talks to it over stdin and stdout. The global --user flag is required: WP-CLI runs as no user by default, so the server refuses to start without one.
Verifying the connection
Once connected, ask your client to call the list-post-types or list-posts tool. If you get a result back, the connection and auth are working. If you get a 401/403, check that the WordPress user has at least the edit_posts capability (an Editor or Administrator role satisfies this by default); for an Application Password, double-check the base64 encoding too; for OAuth, check that WPMCP_OAUTH_ENABLED is defined and that the client was approved with the access level you expected.
Step-by-step guides per client: Claude and WordPress, Claude Code and WordPress, Cursor and WordPress and ChatGPT and WordPress.
See Tools reference for the full list of available tools once you are connected.
Previous: Getting StartedNext: The Safety ModelAll documentation